
I wanted to design a planner for 2009
Supplies:
12 sheets of copy paper
2 sheet 8 ½ X 11 white cardstock
12 sheets of 12 X 12 cardstock
Chipboard (I used a cereal box)
2 pieces of 12 X 12 pattern paper
Paperclips
12 different ribbons (24 inches each)
Gaffer or Hockey Tape
Adhesive
Ink
Tools:
Trimmer
Cropodile
Hole Punch
3 inch scallop punch (optional)
Printer12 sheets of copy paper
2 sheet 8 ½ X 11 white cardstock
12 sheets of 12 X 12 cardstock
Chipboard (I used a cereal box)
2 pieces of 12 X 12 pattern paper
Paperclips
12 different ribbons (24 inches each)
Gaffer or Hockey Tape
Adhesive
Ink
Tools:
Trimmer
Cropodile
Hole Punch
3 inch scallop punch (optional)
Instructions:
I would recommend printing out the Important Numbers and Days PDF on white cardstock. For the calendar pages regular copy paper works great!
• Print out your 12 month calendar, Important Numbers, and Special Days (which also includes “2009” and “you are here”).
- Fold each month sheet in half.
- Cut “Important Numbers” and Days sheet in half (at 5 ½ inches).
- Cut out “2009”; for “you are here” cut out leaving a 1 1/2 inch border below the word "here".
- For “Important Numbers” trim 1/8 of an inch off of top, left side, and bottom.
- For “Important Days” trim 1/8 of an inch off of top, right side, and bottom.
- Set aside.
• Pick out and trim each cardstock sheet to 12 X 11.

• Score each cardstock piece at 8 ½ inches horizontally or the side that measures 12 inches. Then turn your cardstock and score at 5 ½ inches vertically or the side that measures 11 inches. Fold on score lines.
• With your cardstock folded into the portfolio measure and mark ½ of an inch on both sides of pocket top, using your score lines as a guide. Draw a line from your ½ inch mark to the centre bottom of your pocket to form an isosceles triangle. Cut out triangle. Apply a thin bead of glue on the left and right edges, fold portfolio bottoms up to form portfolio. Repeat on all twelve portfolios and set aside.


• Trim three chipboard pieces to measure…
(2) – 5½ X 8½
(1) – 2 X 8½
• Now we’ll need to alter 2 pieces of pattern paper to create one large piece. Trim pattern paper to measure 8 X 9½. Lay your pattern paper pieces right side down, overlapping 1 inch; using adhesive attach these together.


• Using double sided tape attach you chipboard pieces as shown (leaving ¼ of an inch between front/back covers and spine).

• Fold each corner down and attach with wet adhesive.

• Pre-fold each side down and then attach using double sided tape.


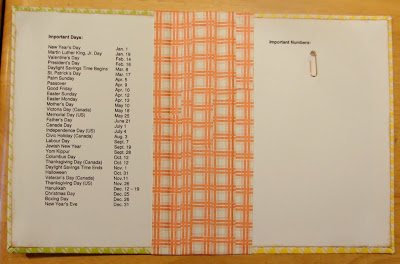
• Ink edges of “Important Days and Important Numbers” sheets, if desired. For the “Important Numbers” make a pencil mark 1¼ inches down and 2½ inches across. Punch hole and insert a paper clip.


• Attach your “Important Days and Important Numbers” to inside covers.

• Wrap gaffer, book binding tape, or cloth hockey tape around the spine. I used five – 19 inch strips of gaffer tape.
• Draw a ½ inch line on the top and bottom of binding area. Punch a continuous line of holes just above your line. This will not be visible once the ribbon is all tied on.

• Cut 24 inches of 12 different ribbons.
• Insert your monthly pages in their folders. Punch a hole ½ of an inch from the top and ½ of an inch from the bottom. You can use your continuous binding holes as a guide.
• Thread ribbon through top of binding holes and then through the top of your January portfolio and calendar page. Leave about 4 inches of ribbon at top. Pull down and thread through binding, portfolio, and calendar page. Go around the bottom and pull up to the top and finally tie a knot. Continue until all pages are in the planner.


• If desired punch a 3 inch scalloped circle, ink edges, and attach to the front of your planner. If desired ink edges of “2009” and attach in the centre of you circle.
• Ink edges of the “you are here” tab and attach with a paper clip onto the January portfolio. I attached a paper clip to all my portfolios just for fun and you’re done!


Here is a link to a PDF of the entire lesson for you to print!
If you have any questions please do not hesitate to
contact me...andreawiebe73@gmail.com
If you have any questions please do not hesitate to
contact me...andreawiebe73@gmail.com
It has been deeply placed on my heart to start another
blog for 2009...I will still be updating A Journey
regularly with my projects and tutorials
which I totally love making and sharing.
The name of the other blog is 52 Pick Me Up.
You can see it here :)
It will be a place for inspiration and love.
Inspiration that will *pick you up*.
 I start with a really sturdy chipboard on the back....
  Then I add a little handful of lined index cards...


 • Cut one of the sides in half.
 • Machine sew around edge with right sides together.


